Open Source CLI
The Plumber CLI analyzes GitLab CI/CD pipelines and GitHub Actions workflows from the command line, checking them against a single .plumber.yaml policy. Both providers share the same engine (OPA / Rego), the same output format, and the same exit codes: write a policy once, scan both.
Install the CLI first, then pick the page for the platform you scan. Each provider page is a complete, self-contained guide (authentication, running a scan, the control catalog, the issues, and configuration):
Installation
GitLab
GitHub
This page is the shared reference: the provider-agnostic command set and the output formats (PBOM, CycloneDX, JSON shape).
This is useful for local testing, CI/CD integration, security-team audits, or automated compliance checks across either platform.
View on GitHubCommand Reference
The full CLI reference. The analyze command takes provider-specific flags and tokens; the config commands, plumber explain, and exit codes behave identically for both providers.
plumber analyze
The main command for analyzing GitLab CI/CD pipelines and GitHub Actions workflows.
plumber analyze [flags]Flags
| Flag | Required | Default | Description |
|---|---|---|---|
--gitlab-url | No* | auto-detect | GitLab instance URL (e.g., https://gitlab.com). Mutually exclusive with --github-url. |
--github-url | No* | auto-detect | GitHub host (e.g., github.com or ghes.example.com). Mutually exclusive with --gitlab-url. |
--project | No* | auto-detect | Project / repo path. GitLab: group/project. GitHub: owner/repo. |
--config | No | .plumber.yaml | Path to configuration file |
--threshold | No | 100 | Minimum compliance % to pass (0-100) |
--branch | No | Project default | Branch to analyze |
--output | No | - | Write JSON results to file |
--pbom | No | - | Write PBOM (Pipeline Bill of Materials) to file |
--pbom-cyclonedx | No | - | Write PBOM in CycloneDX SBOM format |
--print | No | true | Print text output to stdout |
--score-point | No | false | Add the full points breakdown table to stdout and the MR comment. The Plumber score banner is shown by default; this flag adds the per-issue-code detail |
--mr-comment | No | false | Post/update a compliance comment on the merge request (MR pipelines only; requires api scope) |
--badge | No | false | Create/update a Plumber compliance badge on the project (requires api scope; only runs on default branch) |
--controls | No | - | Run only listed controls (comma-separated). Cannot be used with --skip-controls |
--skip-controls | No | - | Skip listed controls (comma-separated). Cannot be used with --controls |
--fail-warnings | No | false | Fail on warnings: configuration warnings such as unknown keys (exit 2) and "could not verify" warnings such as a skipped known-CVE check (exit 3) |
--ci-config-path | No | auto-detect | Override CI configuration file path. Defaults to project CI config path from GitLab settings (usually .gitlab-ci.yml) |
--verbose, -v | No | false | Enable verbose/debug output |
Info
* Auto-detected from git remote (requires origin) if not specified. Supports both SSH and HTTPS remote URLs.
* You can always override with --gitlab-url and --project
Environment Variables
| Variable | Required | Description |
|---|---|---|
GITLAB_TOKEN | GitLab only | GitLab API token with read_api + read_repository scopes (from a Maintainer or higher). Use api scope instead if --mr-comment or --badge is enabled. |
GH_TOKEN / GITHUB_TOKEN | GitHub only | GitHub API token. Fine-grained PAT needs Contents: Read, Metadata: Read, Administration: Read. Classic PAT needs repo. Alternatively, run gh auth login and Plumber will pick up the gh CLI credential. |
PLUMBER_METADATA_TOKEN | No (GitHub) | Token used only to resolve third-party action versions for the known-CVE check (ISSUE-703). Set it when an action is hosted in an org with an IP allow list that blocks the runner's GITHUB_TOKEN; a public-repository read scope is enough. Takes precedence over GH_TOKEN for that lookup and carries the higher authenticated rate limit. When unset, Plumber falls back to an anonymous read. |
PLUMBER_NO_UPDATE_CHECK | No | Set to any value (e.g., 1) to disable the automatic version check. |
plumber config init
Interactive wizard to create a minimal .plumber.yaml: pick policy areas (container images, pipeline composition, branch protection, variables) and only those controls are written. For each selected area, prompts cover the tunable fields in the schema (lists, booleans, GitLab access levels, required expressions for catalog components and file templates, and so on).
Requires an interactive terminal (TTY). In CI or Docker without a TTY, use plumber config generate instead and edit the file.
Contrast: plumber config generate always writes the full default template with comments; init writes a short file shaped by your answers.
plumber config init [flags]| Flag | Default | Description |
|---|---|---|
--output, -o | .plumber.yaml | Output file path |
--force, -f | false | Overwrite existing file without asking |
Examples:
plumber config initplumber config init -o configs/plumber.yamlplumber config generate
Writes the official default .plumber.yaml: the full template Plumber ships with, including comments and every control documented inline. Safe for scripts and CI (no prompts). Use plumber config init when you have a TTY and want a smaller file with only the checks you pick.
plumber config generate [flags]| Flag | Default | Description |
|---|---|---|
--output, -o | .plumber.yaml | Output file path |
--force, -f | false | Overwrite existing file |
Examples:
plumber config generateplumber config generate --output my-plumber.yamlplumber config generate --forceplumber config migrate
Upgrades a .plumber.yaml from schema v1 (top-level controls:) to schema v2 (per-provider gitlab.controls: / github.controls:). Comments and YAML anchors are preserved. The migration is idempotent: running it against a file already on v2 is a no-op with a friendly exit message.
By default the tool writes a sibling .plumber.yaml.v2 so you can diff before swapping. Pass --in-place to overwrite the original; the previous file is backed up to .plumber.yaml.bak.
plumber config migrate [flags]| Flag | Default | Description |
|---|---|---|
--config, -c | .plumber.yaml | Source file to read |
--in-place | false | Overwrite the source. Original is preserved as .plumber.yaml.bak. |
Examples:
# Write a sibling .plumber.yaml.v2; diff before swapping.plumber config migratediff .plumber.yaml .plumber.yaml.v2mv .plumber.yaml.v2 .plumber.yaml
# Or migrate in place, with backup.plumber config migrate --in-place
Info
Plumber still loads v1 files in the current release; the loader auto-converts them in memory and emits a one-line deprecation warning each run. v1 support will be removed in 1.0.0, so migrating is the safe path before that release.
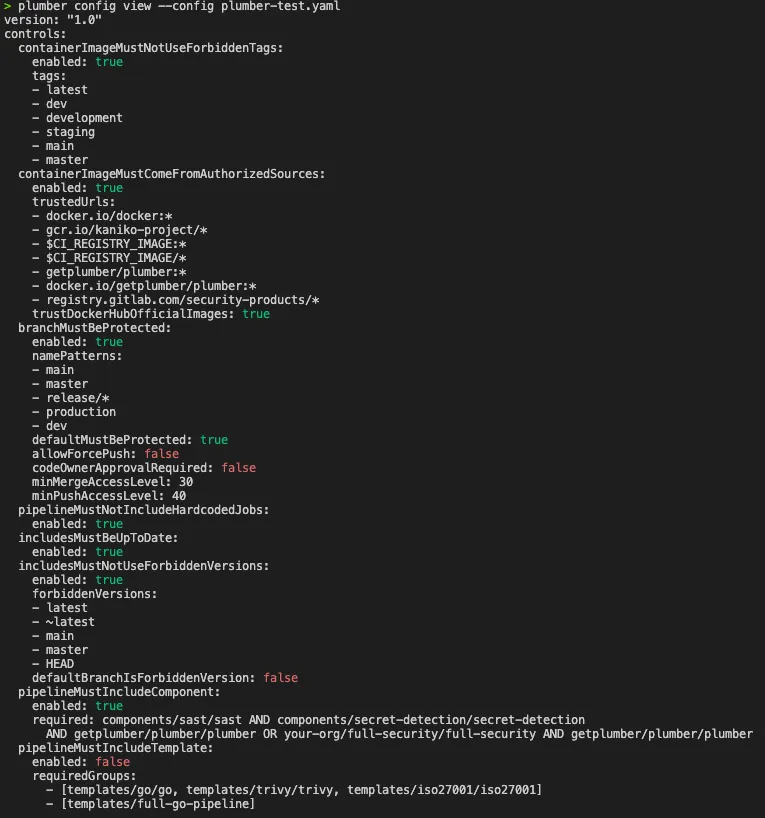
plumber config view
Display a clean, human-readable view of the effective configuration without comments.
plumber config view [flags]| Flag | Default | Description |
|---|---|---|
--config, -c | .plumber.yaml | Path to configuration file |
--no-color | false | Disable colorized output |
Booleans are colorized for quick scanning: true in green, false in red. Color is automatically disabled when piping output.
Examples:
# View the default .plumber.yamlplumber config view
# View a specific config fileplumber config view --config custom-plumber.yaml
# View without colors (for piping or scripts)plumber config view --no-color
plumber config validate
Validate a configuration file for correctness. Detects unknown control names and sub-keys with typo suggestions using fuzzy matching.
plumber config validate [flags]| Flag | Default | Description |
|---|---|---|
--config, -c | .plumber.yaml | Path to configuration file |
--fail-warnings | false | Treat configuration warnings as errors (exit 2) |
Warnings are printed to stderr so they don't interfere with scripted output. Use --fail-warnings to exit with code 2 when warnings are found (useful in CI).
Examples:
# Validate the default .plumber.yamlplumber config validate
# Validate a specific config fileplumber config validate --config custom-plumber.yaml
# Fail on warnings (for CI pipelines)plumber config validate --fail-warnings
Sample output with typos:
Configuration validation warnings: - Unknown control in .plumber.yaml: "containerImageMustNotUseForbiddenTag". Did you mean "containerImageMustNotUseForbiddenTags"? - Unknown key "tag" in control "containerImageMustNotUseForbiddenTags". Did you mean "tags"? - Unknown key "allowForcePushes" in control "branchMustBeProtected". Did you mean "allowForcePush"?plumber explain
Look up detailed information for an issue code directly from the terminal.
plumber explain [ISSUE-CODE] [flags]ISSUE-CODE supports both full and shorthand forms:
ISSUE-412412
plumber explain ISSUE-412plumber explain 412plumber explain --listSample output (plumber explain ISSUE-412):
ISSUE-412: Docker-in-Docker service detectedControl:     pipelineMustNotUseDockerInDocker
Description:  A CI/CD job uses a Docker-in-Docker (dind) service. On shared runners  running in privileged mode, this enables container escape, lateral  movement, and access to secrets from other jobs on the same runner.
Remediation:  Replace Docker-in-Docker with a safer alternative such as Kaniko or  Buildah for building container images. These tools do not require  privileged mode and avoid the security risks of running a Docker daemon  inside a CI container.
Documentation: https://getplumber.io/docs/use-plumber/issues/ISSUE-412
Exit Codes
| Code | Meaning |
|---|---|
0 | Passed (compliance ≥ threshold) |
1 | Compliance failure (compliance < threshold) |
2 | Runtime error (config error, network failure, missing token, etc.) |
3 | A check could not be verified and --fail-warnings is set (e.g. an action version that could not be resolved) |
Automatic Version Check
When running locally, Plumber checks GitHub for newer releases on every invocation and prints an upgrade notice if one is available. The check runs asynchronously and has a 3-second timeout, so it never slows down the analysis.
The check is automatically skipped when:
- Running in CI environments (
CIorGITLAB_CIenvironment variables are set) - Using a development build (version is
dev)
To disable it manually:
export PLUMBER_NO_UPDATE_CHECK=1Pipeline Bill of Materials (PBOM) & CycloneDX
Plumber can generate a PBOM: a complete inventory of all dependencies in your CI/CD pipeline (container images, components, templates, includes). Two formats are available:
Native PBOM (detailed, pipeline-specific):
plumber analyze --pbom pbom.jsonCycloneDX SBOM (standard format for security tool integration):
plumber analyze --pbom-cyclonedx pipeline-sbom.jsonThe CycloneDX output follows the CycloneDX 1.5 specification and is compatible with tools like Grype, Trivy, and Dependency-Track. When using the GitLab CI component, the CycloneDX file is automatically uploaded as a GitLab CycloneDX report.
Info
CI/CD components and templates do not have CVEs in public vulnerability databases. The PBOM is primarily an inventory and compliance tool: it tells you what's in your pipeline, not whether those items have known vulnerabilities. For image vulnerability scanning, use trivy image or grype directly on the images.
Output JSON shape
plumber analyze --output report.json writes a single JSON object. The keys below are stable for scripting; additional keys may be added in minor versions, existing keys will not be renamed or removed.
Top-level keys
| Key | Type | Description |
|---|---|---|
projectPath | string | Path identifying the analyzed project (e.g. group/project on GitLab, owner/repo on GitHub). |
projectId | number | Provider-side project / repo id, when known. |
defaultBranch | string | Default branch reported by the provider. |
ciConfigSource | string | Source of the CI configuration (e.g. .gitlab-ci.yml, .github/workflows/). |
ciValid | boolean | Whether the CI configuration parsed successfully. |
ciMissing | boolean | True when no CI configuration file was found. |
pipelineOriginMetrics | object | Counts and origins of pipeline jobs (hardcoded, from include, from component). |
pipelineImageMetrics | object | Counts of container images per source / registry. |
compliance | number | Effective compliance percentage (0–100). |
threshold | number | Threshold from --threshold (default 100). |
passed | boolean | True when compliance >= threshold. |
plumberScore | object | Scored severity summary (raw points, severity buckets, final points). |
partialControls | array | Controls that could not fully evaluate. Empty or omitted on a clean run. |
<control>Result | object | One entry per evaluated control (see below). |
Per-control *Result block
Each *Result block has the same baseline shape. Some controls add a few control-specific keys on top.
| Key | Type | Description |
|---|---|---|
issues | array | Findings raised by the control. Each entry carries an ISSUE-XXX code, severity, location, and message. |
metrics | object | Counts the control collected (jobs scanned, images checked, branches inspected, etc.). |
compliance | number | Per-control compliance percentage. |
skipped | boolean | True when the control was disabled in .plumber.yaml or excluded via --skip-controls. |
ciValid | boolean | Same as the top-level field, scoped to what this control needed. |
ciMissing | boolean | Same as the top-level field, scoped to what this control needed. |
version | string | Schema version of the control's output block. |
partialControls entry
When non-empty, each entry has the shape shown in the GitHub auth section above: control, reason, affectedBranches (when relevant), remediation. CI gates should fail loud when this array contains anything, even if compliance reads 100.
Info
Stability: keys documented above are stable across 0.3.x minor versions. New keys may be added without notice. Existing keys will not be renamed or removed without a major-version bump.